Jennifer Lambert

A Sacred Balance

Visit Us On FacebookVisit Us On PinterestVisit Us On InstagramVisit Us On Linkedin
  • Homeschool
    • Book Lists
    • How Do We Do That?
    • Notebooking
    • Subjects and Styles
    • Unit Studies
  • Travel
    • Europe
      • Benelux
      • France
      • Germany
      • Greece
      • Ireland
      • Italy
      • London
      • Porto
      • Prague
    • USA
      • Chicago
      • Georgia
      • Hawaii
      • Ohio
      • Utah
      • Yellowstone and Teton
  • Family
    • Celebrations
    • Frugal
  • Military Life
    • Deployment
    • PCS
  • Health
    • Recipes
    • Essential Oils
    • Fitness
    • Mental Health
    • Natural Living
    • Natural Beauty
  • Faith
  • About Me
    • Favorite Resources
    • Advertising and Sponsorship
    • Policies
  • Reviews

© 2025Jennifer Lambert · Copyright · Disclosure · Privacy · Ad

Slow Cooker Asian Pork Ribs

This blog may contain affiliate links: disclosure.
Please see my suggested resources.

January 26, 2017 By Jennifer Lambert Leave a Comment

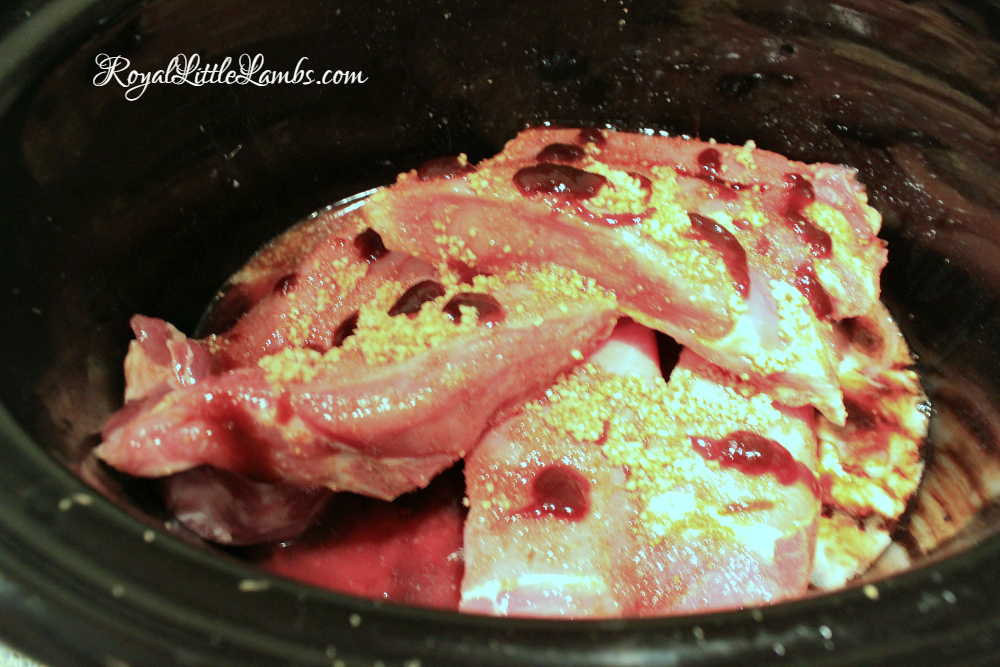
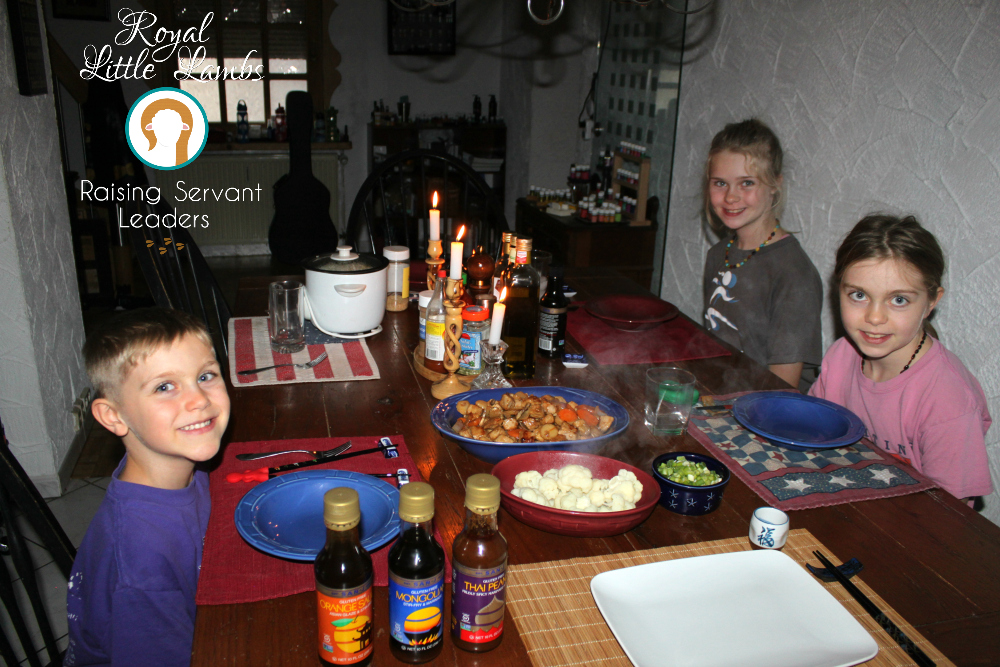
Slow Cooker Asian Pork Ribs is one of my family’s favorite meals.

It’s a simple and flavorful fix and forget meal.

slow-cooker-asian-pork-ribs

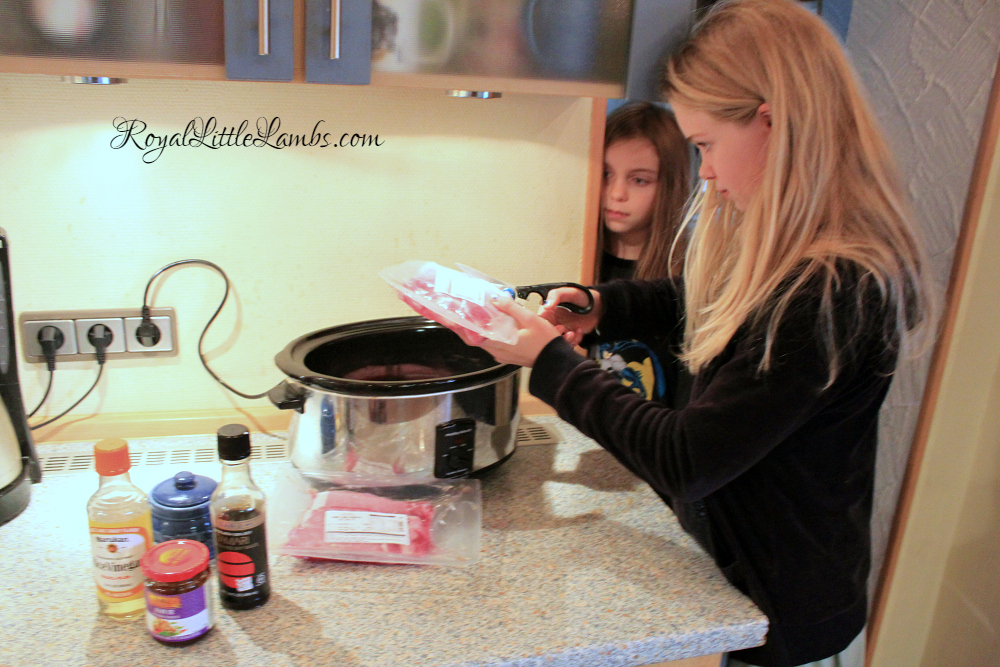
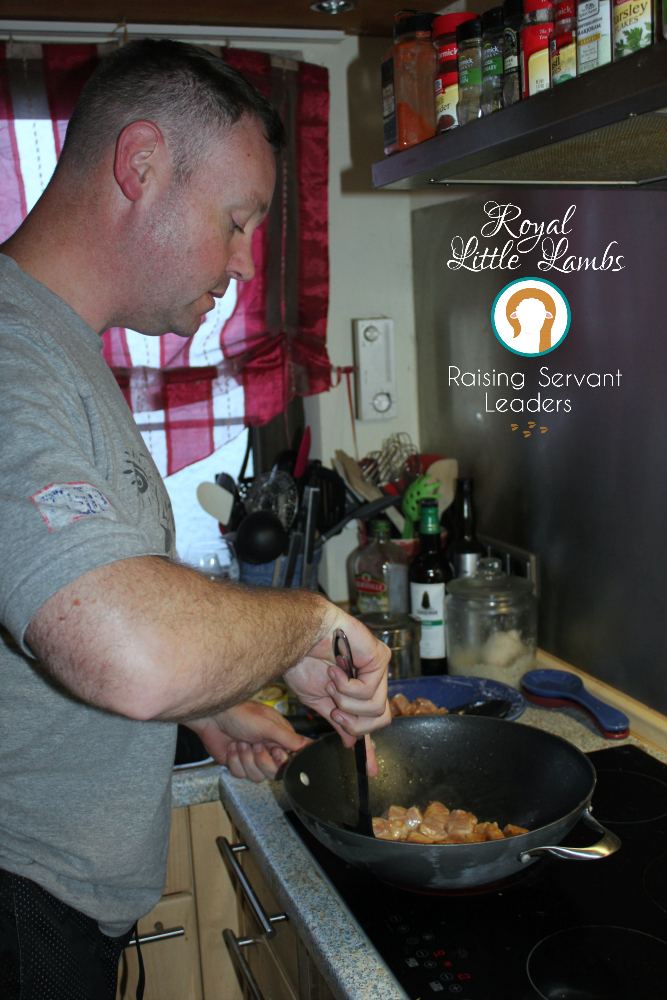
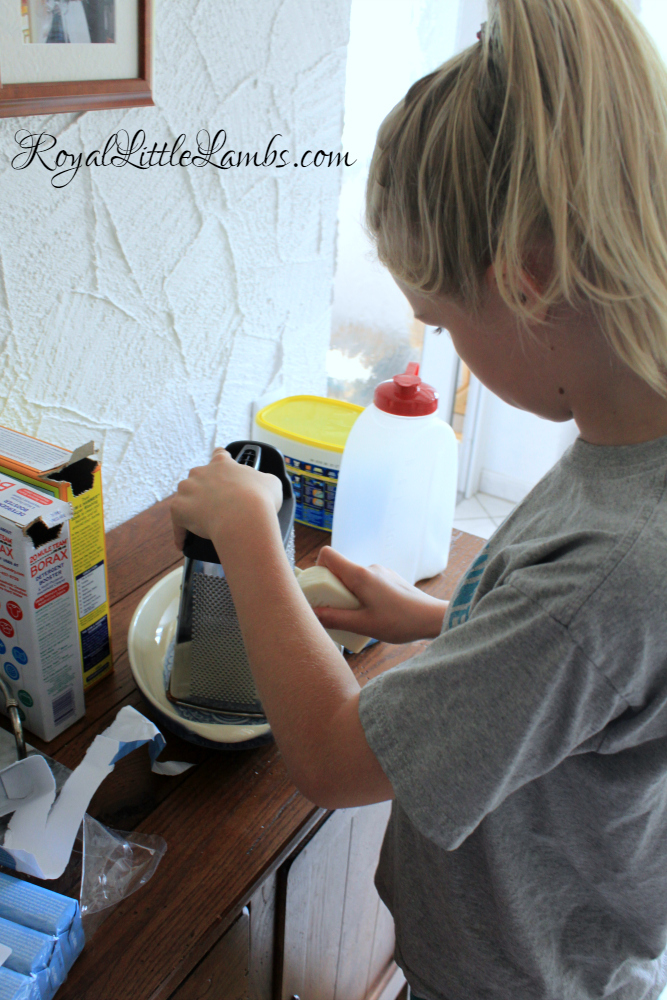
My girls love to prepare this meal for a great dinner we all look forward to all day long.

preparing-slow-cooker-asian-pork-ribs

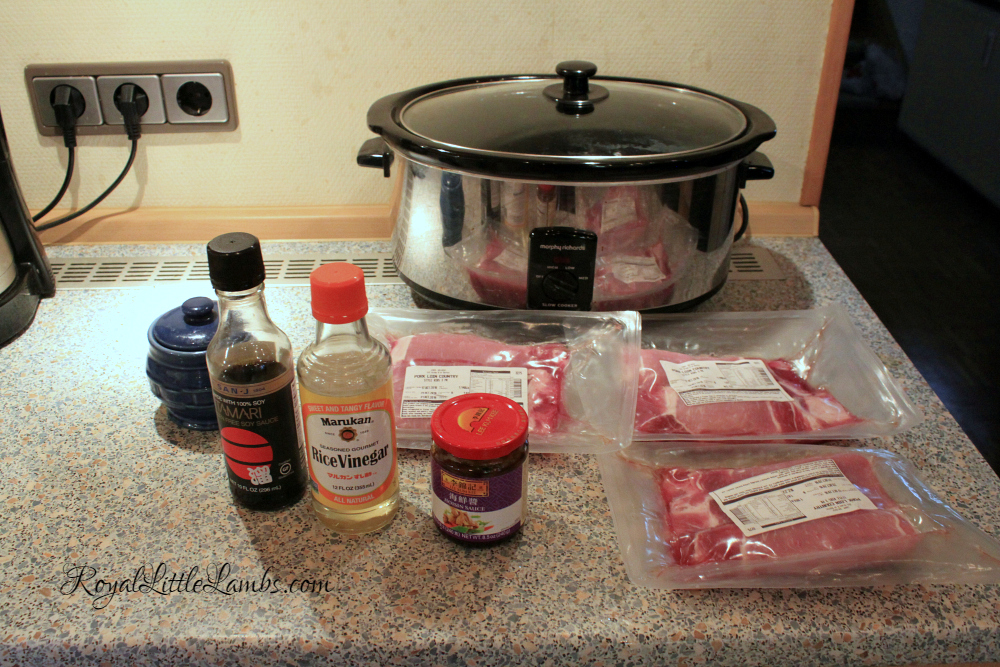
We buy country style pork ribs and drizzle them with Hoisin sauce, soy sauce, Mirin, brown sugar, minced garlic, grated ginger, and sherry.

slow-cooker-ribs

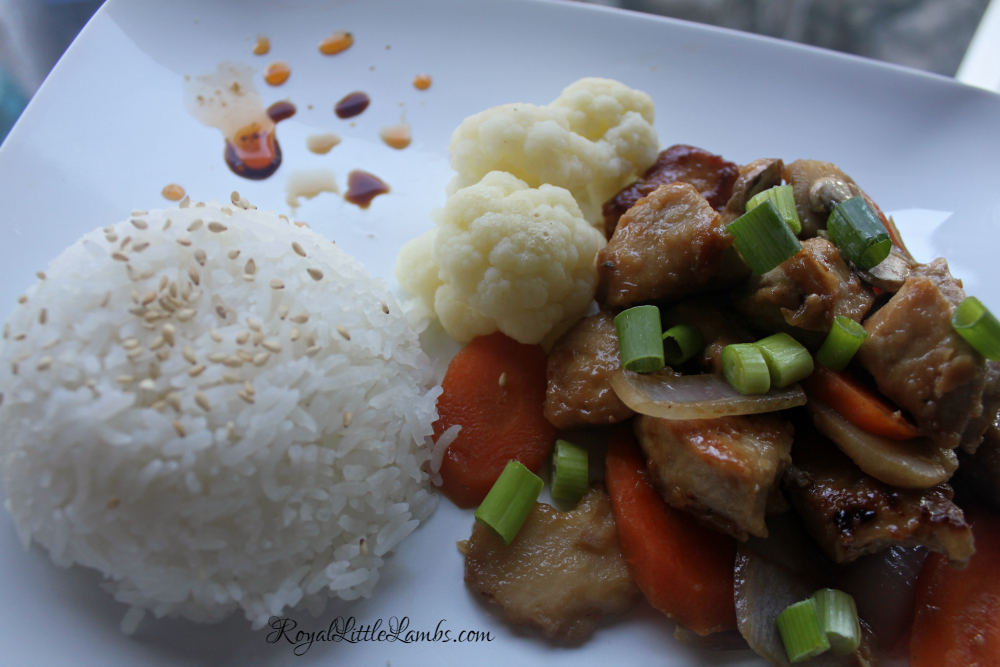
They’re fall apart good!

I love my slow cooker that has a medium setting, so they’re still firm, but tender and moist.

We like to serve these with jasmine rice and steamed vegetables.

Slow Cooker Asian Pork Ribs
Print

Slow Cooker Asian Pork Ribs

Course Main Dish
Cuisine Asian
Prep Time 5 minutes
Cook Time 4 hours
Total Time 4 hours 5 minutes
Servings 6

Ingredients

  • 2 lbs country style pork ribs
  • 1/4 c soy sauce
  • 1/4 c Hoisin
  • 1/4 c Mirin
  • 1/4 c dry sherry
  • 1/4 c brown sugar
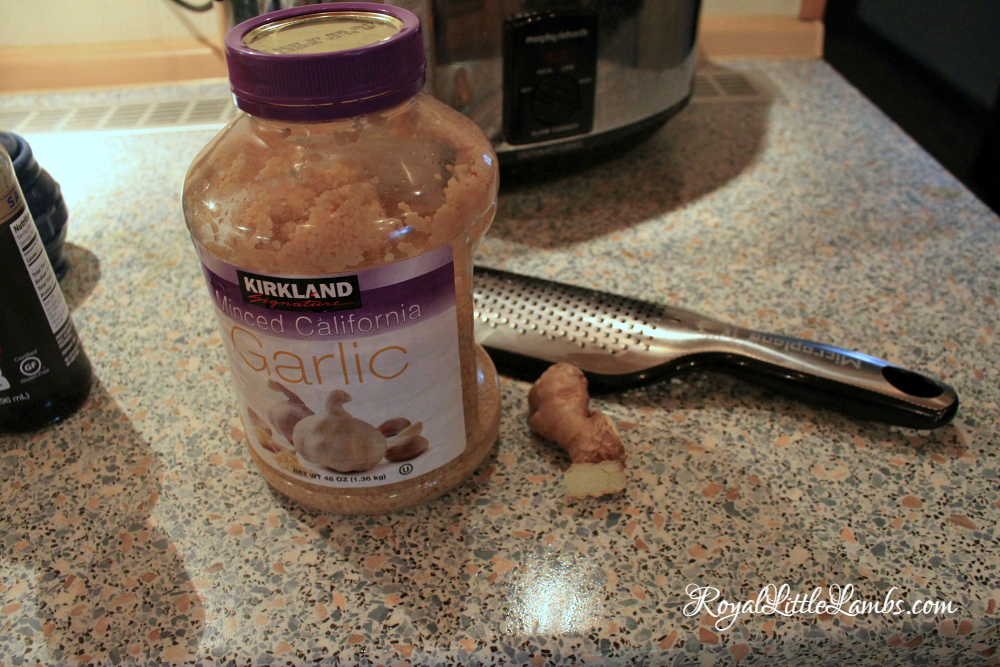
  • 2 t minced fresh garlic
  • 2 t grated fresh ginger

Instructions

  1. Place country pork ribs in slow cooker.
  2. Mix sauce ingredients together in small bowl and pour over ribs.
  3. Cover and slow cook for 6 hours.
  4. Serve with jasmine rice and steamed veggies.


Share
Pin2
Share
2 Shares
You might also like:

Filed Under: Recipes Tagged With: dinner, pork, recipe, slow cooker

Cashew Chicken

This blog may contain affiliate links: disclosure.
Please see my suggested resources.

December 27, 2016 By Jennifer Lambert 7 Comments

Cashew chicken is a favorite at our house.

It’s easy to make on a weeknight.

It’s even easy enough for my kids to make it!

Everyone loves it – even my baby niece who eats next to nothing. They now call it “Aunt Jennifer’s Chicken.”

We chop up boneless skinless chicken breasts into bite-size chunks. Sprinkle on a little cornstarch and stir in some sugar, salt, sesame oil, and soy sauce. We let it sit for about 30 minutes. This makes a delicious crust when it’s stir-fried in hot oil. We use peanut oil, but coconut oil or olive oil works well too. We avoid canola and most other oils.

Marinating Chicken

My kids love to help by chopping up veggies and setting the table. They often help cook too! The hot oil is a bit too dangerous – even for me. The husband usually does that part.

Yes, she knows she’s supposed to have her hair pulled back. Sigh.

Chopping Vegetables

My husband heats up peanut oil in the wok. He stir-fries the chicken in batches.

Sauteeing Chicken

After stir-frying the chicken, we let it drain in a colander.

He stir-fries the veggies, then adds the chicken and sauce in.

Draining Chicken

These are our favorite cashews. (you can use almonds or peanuts or none at all!)

Our Favorite Cashews

I blend the sauce in a measuring cup. It’s just chicken stock, cornstarch, and Hoisin sauce. Super simple but very flavorful! I often use lots of minced garlic.

Sauce for Cashew Chicken

I like onions, peppers, and mushrooms in mine. The kids prefer just water chestnuts. I make jasmine rice and usually steam some broccoli, carrots, and cauliflower also.

We always have happy kids on Cashew Chicken night!

Cashew Chicken for Dinner
Print

Cashew Chicken

Course Main Dish
Cuisine Asian
Prep Time 20 minutes
Cook Time 20 minutes
Total Time 40 minutes
Servings 6

Ingredients

  • 4-6 chicken breasts or thighs boneless skinless
  • 1 c vegetables water chestnuts, onions, bell peppers, mushrooms, etc.
  • 2-3 T peanut or coconut oil
  • 1/2 c cashews

Marinade

  • 2 T soy sauce
  • 2 T sesame oil
  • 2 T cornstarch
  • 1 T sugar

Sauce

  • 1 T cornstarch
  • 1.5 c chicken stock
  • 2 T hoisin sauce

Instructions

  1. Slice chicken into bite-sized pieces.
  2. Roll chicken pieces in cornstarch. Marinate in soy sauce, sesame oil, and sugar.
  3. While chicken is marinating, chop veggies and prep rice. Mix sauce in a small bowl or measuring cup. Set aside.
  4. Stir fry chicken in small batches in wok or large skillet. Drain in colander or on paper towels.
  5. Stir fry or steam veggies.
  6. Return chicken to pan and pour in sauce. It should thicken quickly. Add veggies to saucy pan if desired. Sprinkle cashews over top. Garnish with cilantro if desired.
  7. Serve over jasmine rice.

Other Kids in the Kitchen recipes:

Raspberry White Frozen Hot Chocolate – Cooking with Kids | The Gifted Gabber

Super-Healthy and Super-Yummy Strawberry Pineapple Smoothie | Living Montessori Now

Linking up: LouLou Girls, Modest Mom, Strangers & Pilgrims on Earth, Tell Me a True Story, What Joy is Mine, Pat and Candy, VMG206, Oh My Heartsie Girl, Southern Beauty Guide, Classical Homemaking, Holly Barrett, Holley Gerth, Live Laugh Rowe,  Feeding Big, Creative K Kids, Life Beyond the Kitchen, Sincerely Paula, Create with Joy, Happy and Blessed Home, Juggling Real Food and Real Life, Sugar Spice and Family Life, Being a Wordsmith, Strawberry Butterscotch, Saving 4 Six, Kids Activities Blog,
Share
Pin5
Share
5 Shares
You might also like:

Filed Under: Recipes Tagged With: chicken, dinner, recipe

Chocolate Spice Cookies

This blog may contain affiliate links: disclosure.
Please see my suggested resources.

November 22, 2016 By Jennifer Lambert 12 Comments

These Chocolate Spice Cookies are a hit with my family and anywhere I choose to take them.

Chocolate Spice Cookies
My girls love to help in the kitchen, especially when cookies are involved!

The girls were a big help!

These chocolatey cinnamon cookies are warm and delicious.

A perfect holiday treat!

We love using essential oils in baking. They have a strong flavor and aroma.

Cinnamon oil makes chocolate delectable!

cookies-ready-for-the-oven
baked-chocolate-spice-cookies
chocolate-spice-cookies

These cookies smell amazing and they’re just the right amount of spice!

Print

Chocolate Spice Cookies

Cuisine Holiday
Prep Time 15 minutes
Cook Time 10 minutes
Total Time 25 minutes
Servings 3 dozen

Ingredients

  • 12 oz package chocolate chips
  • 3/4 cup AP flour
  • 1/2 tsp baking powder
  • 1/4 tsp kosher or sea salt
  • 1/4 cup butter
  • 1/2 cup white sugar
  • 1/4 cup brown sugar
  • 2 large eggs
  • 2 tsp vanilla
  • 2 tsp cinnamon or 5 drops cinnamon essential oil
  • 1 tsp chili pepper powder

Instructions

  1. Melt 1/2 chocolate chips in a double boiler or in the microwave.
  2. Cream butter and sugars.
  3. Add eggs. Beat until light in color. Add vanilla, cinnamon or oil, and pepper.
  4. Add melted chocolate to sugar mixture. Mix well.
  5. Whisk together flour, baking powder, and salt in a separate bowl.
  6. Add dry ingredients to wet, folding in just until mixed. Fold in the remainder of the chocolate chips
  7. Drop by spoonfuls onto baking sheet.
  8. Bake 375* for about 10 minutes or until crackly on top.
Linking up: A Fresh Start, Inspiration for Moms, Marilyns Treats, Written Reality, Moms the Word, The Chicken Chick, The Logbook, The Mrs. Tee, Life of Faith, Practical Mom, ABC Creative Learning, What Joy is Mine, Strangers & Pilgrims on Earth, Morsels of Life, Peaches and Salt, Sarah Celebrates, Creative K Kids, Simple Life of a Fire Wife, Classical Homemaking, A Proverbs 31 Wife, Women with Intention, VMG206, Jamiffer, Oh My Heartsie Girl, Feeding Big, A Bountiful Love, Life Beyond the Kitchen, Tots and Me,  Frog’s Lilypad, I Choose Joy, Sincerely Paula, Create with Joy, RCH Reviews, Penny’s Passion, Live Laugh Rowe, Katherine’s Corner, Life with Lorelai, Happy and Blessed Home, Juggling Real Food and Real Life, Sugar Spice and Family Life, Crafty Moms Share, Being a Wordsmith, Boondocks,  Classical Homemaking,  Lamberts Lately, Snapcreativity, Design Dining and Diapers,
Share
Pin3
Share
3 Shares
You might also like:

Filed Under: Recipes Tagged With: chocolate, cookies, recipe

Aunt Betty’s Punch

This blog may contain affiliate links: disclosure.
Please see my suggested resources.

October 31, 2016 By Jennifer Lambert 3 Comments

I don’t remember too many family traditions that are unique.

We don’t have any real ethnic background. We had good Southern cooking at holidays and celebrations, but it wasn’t anything super special. It was sure better than any of those cooks on the Food Network though!

My Aunt Betty’s punch was at every holiday and celebration.

It’s super simple and delicious. It’s versatile with fun flavors and colors to match any event.

Festive Punch

I grew up with cousins by the dozens and family events were huge. We always had Aunt Betty’s punch – at birthdays, Easter, Christmas, showers.

My Aunt Betty is 86 and has Alzheimer’s Disease now. My kids got to meet her a couple years ago, when we drove from Utah to Georgia, before flying to Germany. It was a bittersweet moment for me. She’s still so beautiful.

She was the greatest cook! I remember one time I spent the night at her house and she asked what I wanted to eat for dinner. I was probably about 7 or 8 and I told her, “Steak!” Can you believe that she had a little sirloin in her freezer? She thawed it out, seasoned it, and broiled it. It tasted better than any restaurant.

We’ve always lived far away, being a military family. My kids haven’t grown up with many family traditions.

My kids get super excited when we have my Aunt Betty’s punch. I’m making it a tradition because we live far away from family.

I made the punch for our little family Halloween party.

I used pineapple juice and ginger ale and rainbow sherbet. The result was ghoulishly fun.

Memories in a glass right here.

Aunt Betty's Punch

See how the sherbet blends with the juice and soda to make a fun foamy festive punch?

Foamy Punch

Any kind of sherbet can be used. I especially like using raspberry or lime. It makes such a pretty punch. I imagine you could mix it up with different juices or use a lemon-lime soda as well. Maybe a little vodka for extra oompf?

I’ve sometimes frozen fruit pieces (pineapple slices are gorgeous!) in juice cubes and floated that in to keep the punch chilled without watering it down.

Print

Aunt Betty’s Punch

Cuisine Beverage
Prep Time 5 minutes
Total Time 5 minutes
Servings 12 cups

Ingredients

  • 1 2 liter bottle ginger ale
  • 1 large can pineapple juice
  • 1 pint sherbet
Share
Pin2
Share
2 Shares
You might also like:

Filed Under: Recipes Tagged With: holiday, punch, recipe

Easy Stir Fry

This blog may contain affiliate links: disclosure.
Please see my suggested resources.

September 25, 2016 By Jennifer Lambert Leave a Comment

We are SO PLEASED to review THREE SAN-J products!

san-j-review

We love SAN-J and it’s our preferred brand of soy sauce. These three fun sauce flavors are now pantry staples.

We love San-J because it’s gluten free. We never realized that other brands of soy sauce contain wheat when we had a friend with Celiac disease have a reaction at our dinner party one night. I felt terrible.

Ever since, we’ve only purchased San-J Tamari. I prefer its rich flavor for marinades and it always stays on our table as a condiment.

Mongolian – sweet and salty. This was a favorite! I want to try it on steak!

Orange Sauce – sweet citrus with a little spice. Nice and thick. I would love this on chicken nuggets!

Thai Peanut – salty, nutty, tangy, and spicy. Perfect for grilled meats!

san-j-stir-fry-pork-and-vegetables

We made a simple pork stir fry with San-J Tamari and provided dipping sauces: San-J Mongolian, Thai Peanut, and Orange Sauce.

3-san-j-dipping-sauces
san-j-dipping-sauces

Cooking is usually a family affair. We often have at least 2 kids in the kitchen, helping.

Tonight, Katie was our helper. Tori set the table. All the kids help clean up. Liz was on a babysitting job, but she came home afterwards and enjoyed the meal while it was still warm!

I chopped up the meat.

chopping-meat

We marinated the meat with San-J Tamari, sherry, sugar, and cornstarch.

marinating-the-meat

Katie helped with the marinade.

marinating-meat

We made my sauce with San-J Tamari, chicken stock, ginger, and sugar.

Katie grated the ginger.

grating-ginger
stir-fry-sauce-with-san-j-tamari

My assistant (husband) stir-fried the meat.

stirfrying-the-meat

The kids were super excited for one of their favorite meals!

ready-to-eat
simple-stir-fry
enjoying homemade stir-fry

Get the Simple Stir-Fry Recipe with San-J Tamari.

It’s super easy and you can use whatever vegetables you have on hand or prefer to make a simple stir-fry. Adding dipping sauces and a variety of vegetables make this a crowd-pleaser!

Print

Simple Stir Fry

Course Main Dish
Cuisine Asian
Prep Time 15 minutes
Cook Time 15 minutes
Total Time 1 hour
Servings 6 people

Ingredients

Marinade

  • 1 large or family package boneless skinless chicken breasts or pork loin chops sliced into cubes
  • 2-3 T cornstarch
  • 1 T sugar
  • 2 T San-J Tamari
  • 2 T dry sherry or Mirin

Sauce

  • 1/3 c chicken stock
  • 1 T sugar
  • 2 T San-J Tamari
  • 1 T grated ginger
  • 1 t sesame oil

Add-ins

  • 1 can sliced water chestnuts
  • 1 carrot sliced thin diagonally
  • 1 bell pepper (any color but green is pretty) chopped into large chunks
  • 5 button mushrooms sliced
  • 1 small onion chopped into large chunks
  • 1 c Napa cabbage chopped roughly into large chunks
  • 4 green onions, chopped for garnish

About San-J

In 1804, San-Jirushi, the founding company of San-J, was established as a Tamari soy sauce and miso company in Mie, Japan. For more than 200 years, their brewing mastery has been passed down through the generations. In 1987, the first Tamari brewery outside of Japan was built in Henrico, Virginia, and San-J was born. Today, San-J president, Takashi Sato, is an eighth-generation member of the founding family and faithfully continues the tradition of quality with a variety of Tamari soy sauces, Asian cooking sauces, salad dressings, soups, and rice crackers. San-J is a trusted soy sauce brand in the natural market, committing itself to ingredient health.

Just The Facts

  • San-J Organic Tamari Gluten Free Soy Sauce is made with 100% soy and no wheat while regular soy sauce is made with 40-60% wheat.

  • The higher concentration of soy protein gives San-J Tamari a richer, milder, more complex taste.

  • Fermented for up to six months with Japanese brewing methods, San-J Organic Tamari Gluten Free Soy Sauce is made without artificial preservatives, flavors, or colors.

  • San-J Organic Tamari Gluten Free Soy Sauce is certified organic, gluten free, vegan, Kosher, and Non-GMO Project verified.

  • A 10 oz. bottle of San-J Organic Tamari Gluten Free Soy Sauce typically retails for around $4.45.

Where To Purchase

San-J products can be found at natural food stores such as Whole Foods Market, Sprouts Farmer’s Market, Earth Fare, Fresh Thyme, and other major grocery stores. To find a retailer near you, visit san-j.com/product-locator. We buy it at our local military commissary!

I received these products for FREE from Moms Meet, May Media Group LLC, who received it directly from the manufacturer. As a Moms Meet blogger, I agree to use this product and post my honest opinion on my blog. The opinions posted are my own.

Many photos by Katie, 9 years old!

Share
Pin
Share
0 Shares
You might also like:

Filed Under: Reviews Tagged With: recipe, review, rice

Homemade Laundry Detergent

This blog may contain affiliate links: disclosure.
Please see my suggested resources.

September 22, 2016 By Jennifer Lambert 8 Comments

A couple of us in the family have sensitive skin, so traditional laundry detergents are irritating to us.

The more natural detergents can be really expensive and many soaps without scent leave my clothes smelling…like vomit.

I’ve experimented with several brands that don’t make my clothes smell good.

I’ve tried several recipes from homemade detergent and this one has been working well for us.

It’s really easy and not very expensive to make. It smells great and no skin irritation. It lasts about 2 months!

I only use a tablespoon or so every laundry load and my clothes smell great!

So, let’s make some laundry detergent!

Gather the ingredients!

Ingredients for Homemade Laundry Detergent

The recipe is super simple. My kids make it now for our family!

We grate two bars of Dr. Bonner’s castile unscented soap. You could use lavender or another castile soap.

Grating Soap
Love Grating Soap

The grated soap looks like little worms. Heehee

It already smells fresh and clean.

Grated Soap

We add two cups each of borax, washing soda, and pure Oxi-clean.

We add 20 or so drops of essential oil. We like lavender or melaleuca or eucalyptus (but not together!). Some people recommend lemon, and I’m sure that smells amazing, but I worry it might bleach the clothes if I hang them to dry in the sun.

Then we shake it all up in this handy pourable container.

Homemade Laundry Detergent

We pour out a couple tablespoons for each laundry load. I don’t really measure it. I don’t fill the dispenser in our washer.

The clothes come out smelling much more fresh than they used to and no irritated skin!

We also use wool dryer balls with a bit of lavender essential oil.

Print

Homemade Laundry Detergent

Prep Time 5 minutes
Total Time 5 minutes
Servings 60

Ingredients

  • 2 cups Borax
  • 2 cups Washing Soda Or 1/2 washing soda and 1/2 baking soda.
  • 2 bars Dr. Bonner’s castile unscented bar soap grated
  • 2 cups or scoops Oxi-Clean optional
  • 20 or so drops essential oil We like lavender or melaleuca!

Instructions

  1. Grate bar soap and mix all ingredients in a jar.
  2. Use 1-2 T each wash load.
  • Simply Clean: The Proven Method for Keeping Your Home Organized, Clean, and Beautiful in Just 10 Minutes a Day by Becky Rapinchuk
  • How to Manage Your Home Without Losing Your Mind: Dealing with Your House’s Dirty Little Secrets by Dana K. White
  • Cleaning House: A Mom’s Twelve-Month Experiment to Rid Her Home of Youth Entitlement by Kay Wills Wyma
  • Unstuffed: Decluttering Your Home, Mind, and Soul by Ruth Soukup
  • Say Goodbye to Survival Mode: 9 Simple Strategies to Stress Less, Sleep More, and Restore Your Passion for Life by Crystal Paine
  • Love the Home You Have: Simple Ways to…Embrace Your Style *Get Organized *Delight in Where You Are by Melissa Michaels
  • CHAOS to Clean: in 31 Easy BabySteps by Marla Cilley
  • Having a Martha Home the Mary Way: 31 Days to a Clean House and a Satisfied Soul by Sarah Mae

You might also like:

  • Cleaning Laminate Flooring
  • Kitchen Pantry Makeover
  • How to Clean a House
  • Spring Clean Your Heart
  • The Benefits of Green Carpet Cleaning
  • Making a Natural Home
  • Minimizing
  • Making a Natural Home
  • Teaching Kids to Cook
  • Purging Clothes
Share
Pin1
Share
1 Shares
You might also like:

Filed Under: Essential Oils Tagged With: diy, homemade, homemaking, recipe

Easy No-Bake Granola Bars

This blog may contain affiliate links: disclosure.
Please see my suggested resources.

August 22, 2016 By Jennifer Lambert 1 Comment

We used to love a particular store-bought peanut butter chocolate chip granola bar. We always had them in our pantry.

When we became more conscious about what we were putting into our bodies, we realized they were full of additives and undesirable things.

I’ve been experimenting to make our own, as close to that flavor we remember.

Our no-bake granola bars, customizable with ingredients like rice cereal, dried fruit, nuts, and nut butter!

Here are all our favorite ingredients:

Granola Bar Ingredients
Katie melts the honey, sugar, and peanut butter:
Making SyrupPeanut Butter Syrup
Tori mixes the dry ingredients:
Mixing Dry Ingredients

Seeds and Nuts and Cereal
We fold in the peanut butter syrup to the dry ingredients:
Getting Ready to Mix
Gooey Granola
I line a pan with parchment paper:
No Bake Granola Bars
I press the granola into the pan:
Press into Pan
Chocolate chips are pressed last so they don’t melt too much.
Add Chocolate
I fold over the parchment and press with my hands, then cover over it all with foil, and refrigerate. For at least an hour, usually overnight.
Cover and Refrigerate
The cold granola cuts pretty. We store it in zip bags in the fridge since it’s a little more gooey than store-bought bars.
Cut into Bars
These granola bars are super easy to make.
You can add different nuts, nut butter (or not), chocolate, dried fruit, seeds, different cereals – make them how you want! You can add more or less sweetener to your taste.
Easy No-Bake Granola Bars

Print

Granola Bars

Prep Time 10 minutes
Total Time 1 hour 10 minutes
Servings 16

Ingredients

Dry ingredients

  • 2 cups oats
  • 1 cup rice cereal
  • 1 cup sliced almonds any chopped nuts
  • 1/4 cup flaxseed
  • 1/4 cup wheat germ
  • 1/8 cup chia
  • 1/4 cup dried fruit optional
  • 1/4 cup chocolate chips optional

Wet ingredients

  • 1/3 cup honey
  • 1/3 cup brown sugar
  • 1/2 cup peanut butter any nut butter, optional
  • 1 t vanilla
  • 1/2 t salt

Instructions

  1. Melt sugars and peanut butter over medium heat and then add salt and vanilla.
  2. Stir together dry ingredients (except chocolate) in a large bowl.
  3. Fold in the peanut butter syrup and mix until incorporated.
  4. Cover a 13×9 baking dish with foil or parchment paper and press into pan.
  5. Press chocolate chips into granola.
  6. Cover and refrigerate at least an hour.
  7. Cut into bars and enjoy!
  8. We keep these in the fridge in baggies since they’re stickier than store-bought granola bars.

Check out other Back to School snacks!

Watermelon Pizza | The Gifted Gabber

Ants on a Log Fun Food Preparation for Preschoolers | Living Montessori Now

Oat and Honey Peach Muffins | Kitchen Counter Chronicles

No bake chewy choc chip muesli bars | Kidgredients

Share
Pin1
Share
1 Shares
You might also like:

Filed Under: Recipes Tagged With: frugal, recipe

Forest Berries

This blog may contain affiliate links: disclosure.
Please see my suggested resources.

July 21, 2016 By Jennifer Lambert 18 Comments

We went foraging in our forest for wild berries.

Forest Berries and Foraging

The girls have been interested in wildflowers for a while, so we acquired some guidebooks to go exploring and identifying plants.

Forest Berries Wildflower Book

We have lots of trails in the woods near our house, meandering all through the Pfalzwald. We love the easy walks to look at the flowers and listen to the birds. There’s even a creek that runs through for us to play in and look for newts.

The blackberries are just now flowering and we haven’t seen any blueberries or raspberries.

The wild strawberries or forest berries (Waldbeeren in German!) are just now ripening along the trails.

First Forest Strawberry

We got quite a bit of ripe forest berries on our hike!

Forest Berries
We brought our harvest back and added sour cherries to our kombucha and snacked on the wild strawberries.

The wild strawberries are super sweet and the kids prefer them to store-bought strawberries because the seeds aren’t so big and they’re so cute and tiny.

We also went on another walk later in the week and harvested sweet cherries to make into sauce.

Safety first! When foraging, you have to be 150% sure of correct identification. Books aren’t the most reliable ways to go foraging. It’s better to have an educated local guide to help differentiate between similar plants. We saw a plant that looked like a bilberry, but I was too nervous to try!

We made Blueberry Buckle for breakfast one morning, but with storebought berries.

Blueberry Buckle Kids in the Kitchen

Katie loves baking and is quite adept at breakfast cakes!

Kids in the Kitchen Blueberry Buckle

I really love the little pop of ginger in this blueberry buckle. It freshens the taste of the cake and berries.

Blueberry Buckle
Print

Blueberry Buckle

Course Breakfast
Cuisine cake
Prep Time 10 minutes
Cook Time 35 minutes
Total Time 45 minutes
Servings 8 slices

Ingredients

Cake

  • 2 cups flour AP works fine, but we like cake or pastry flour
  • 1 t baking powder
  • 1/2 t salt
  • 1/2 t ginger ground is fine, but fresh grated adds kick!
  • 2 T butter
  • 3/4 c sugar
  • 1 egg
  • 1/2 c milk
  • 1 small package blueberries fresh or frozen (about 1.5 cups)

Topping

  • 1/2 c sugar we used brown sugar for more depth
  • 1/3 c flour
  • 1/2 t nutmeg
  • 2 T butter chilled works better
More recipes:Strawberry Pretzel Salad/Dessert | The Gifted GabberHealthy Frozen Raspberry and Yogurt Dessert {Dairy-Free & Gluten-Free} | Living Montessori NowLinking up: Crafty Moms Share, Ask Latisha, The Crazy Organized Blog, Oh My Heartsie Girl, Denise Designed, Saving 4 Six, Bloghetti, Life of Faith, Books and Giggles, What Joy is Mine, Marilyns Treats, Modest Mom, A Fresh Start on a Budget, Inspiration for Moms, Written Reality, Strangers and Pilgrims on Earth, Smart Moms Smart Ideas, Darling Downs Diaries, MaryAndering Creatively, Practical Mom, Curly Craft Mom, Holly Barrett, Cornerstone Confessions, VMG206,  Sarah Celebrates, RCH Reviews, Simple Life of a Fire Wife, Sherry Wilson, ABC Creative Learning,  Raising Homemakers, Jamiffer, Penny’s Passion, Adventures of Mel, Lamberts Lately,  I Choose Joy, Frog’s Lilypad, Pat and Candy, Bloom Designs, Pocketful of Posies, A Little R&R, Live Laugh Rowe, Katherine’s Corner, The Natural Homeschool, Crystal and Comp, A Bountiful Love,  A Bowl Full of Lemons, Feeding Big, Christian Montessori Network, Design Dining and Diapers, Sincerely Paula, OMHG,  Create with Joy, The Diary of a Real Housewife, Life with Lorelai, Cooking on a Budget, Happy and Blessed Home, Sugar Spice and Family Life, Our Daily Craft, Being a Wordsmith,
Share
Pin5
Share
5 Shares
You might also like:

Filed Under: Recipes Tagged With: homeschool, nature study, recipe, summer

Cool Fruit Ices

This blog may contain affiliate links: disclosure.
Please see my suggested resources.

June 28, 2016 By Jennifer Lambert Leave a Comment

Our summers are short here in Germany.

It’s often rainy and cloudy and temperatures can drop suddenly. Our plans have to remain flexible.

When the sun shines and it’s warm, we rush to the pools, barefoot parks, and make fun, cool treats to enjoy!

My girls love simple fruit ices that combine real fruit into a delicious cool treat to beat the heat.

We don’t have air conditioner, so staying cool in summer can be a challenge.

This week, we combined fresh watermelon, lime juice, honey, and ice in the blender to cool off.

I sliced and chopped the juicey watermelon and added it to the blender.

Katie added ice and honey and lime juice.

Making Ices

She likes to push the “on” button.

Blending Ices

These ices are super simple and not too sweet.

Pretty Straw in Watermelon Ice

We also love making ices with berries. These are also fun to freeze in silicone tubes!

Easy Watermelon Ices

Cool real fruit treats are healthy in the summertime or anytime. Also great with additions of strawberries, pineapple, or mint!

Print

Fruit Ices

Cuisine Beverage
Prep Time 5 minutes
Total Time 5 minutes
Servings 4 cups

Ingredients

  • 1/2 small watermelon seedless (If you can’t get seedless, you might need to blend and strain the watermelon first.)
  • 1-2 T honey or agave
  • 1-2 T lime or lemon juice
  • 1 cup ice

Instructions

  1. Cut the watermelon flesh from the rind. Cube the watermelon and add to the blender.
  2. Add sweetener, juice, and ice to blender and blend until smooth and frothy.
  3. Pour into pretty cups or jars with fun straws and ENJOY!


Check out the other cool treats!

Strawberry-Peach Ice Cream Float | The Gifted Gabber

Kids’ Kitchen: Berry Yummy and Healthy Protein-Rich Popsicles | Living Montessori Now

Strawberry Creamsicles | Kitchen Counter Chronicles

Simple Watermelon Popsicles  |  Royal Baloo

Homemade Ice Cream in a Bag | Mess for Less

Share
Pin4
Share
4 Shares
You might also like:

Filed Under: Recipes Tagged With: recipe, summer

Tea Sandwiches

This blog may contain affiliate links: disclosure.
Please see my suggested resources.

May 24, 2016 By Jennifer Lambert Leave a Comment

It’s been cold and rainy here all month-long. We even had frost in the mornings last week!

The kids loved having a fancy tea at Ashford Castle, so we decided to recreate those yummy sandwiches in our own home.

We love having a fancy tea time for lunch on rainy days and listening to classical music.

I gathered the ingredients for several kinds of tea sandwiches:

  • Smoked Salmon
  • Turkey Avocado
  • Cucumber
  • Peanut Butter and Honey
Mise en Place

The peanut butter and honey whipped together is quite special.

I mixed half a package of cream cheese and Greek yogurt (that looks like 1/2 cup, yes?) with chopped chives.

I love that my German friends call cream cheese “The cheese that is not cheese.”

Cream Cheese with Chives and Yogurt

I added some salt and pepper. I couldn’t get it very smooth. I think letting it sit out to get room temperature is key.

Chive Cream Cheese

I mashed avocado with salt and pepper. You can add a little lemon or lime juice if you’re worried about it oxidizing. Or you can just use a container of premade guacamole.

Mashed Avocado

We had some leftover curry turkey breast that works so well! I miss this from our German butcher shop.

Curry Turkey

For pretty, trim the crusts off the bread. Yes, I used icky store-bought bread. We almost never do. But the German stuff is much cleaner than the American bread. And I know there are some organic ones that are healthier.

Crustless Bread

I sliced the cucumbers thin. I didn’t peel them first.
Don’t mind my nails. I’ve been gardening. And I’m a mom. I haven’t had a mani-pedi in over 3 years.

Thin-Sliced Cucumbers

I used a biscuit cutter to make some bread rounds.

Round Bread

Then I assembled the sandwiches.

I used the cream cheese mixture with the smoked salmon.

I also chopped spinach and parsley and added that for a touch of green and flavor.

I think next time, I need some more seasoning. They were just a little bland.

Assembling Smoked Salmon Sandwiches

The cucumber sandwiches were perfect with the spinach and parsley.

Watercress is more traditional, but I couldn’t find any this week.

Assembling the Cucumber Sandwiches

I roll the turkey avocado sandwiches with sliced almonds for an extra special touch. They’re Liz’s favorite.

I used a dab of the cream cheese spread for almond glue, but mayonnaise works fine too.

Turkey Avocado with Almonds

My middle girls dressed up for the occasion.

Sisters at Tea Time

My teen was miserable and cold. It was rainy all day long. German houses are stone and always cool.

The turkey avocado are her favorites so she’s almost happy!

Tea Time with My Teenager

I also made little triangle sandwiches with the curry turkey and some of the peanut butter honey. They were amazing.

My son ate something totally different. He’s not into sandwiches yet.

Our pretty sandwich platter:

Tray of Tea Sandwiches

I added some fresh local berries and chopped veggies with homemade maple oatmeal scones to complete our tea.

Tea Sandwiches
Print

Tea Sandwiches

Fun tea sandwiches for any occasion!
Cuisine Holiday
Prep Time 30 minutes
Total Time 30 minutes

Ingredients

Cream Cheese Spread

  • 1/2 package cream cheese
  • 1/2 cup Greek yogurt
  • 1 T chives chopped

Peanut Butter and Honey

  • 1/2 cup natural peanut butter
  • 1 T local honey

Turkey Avocado

  • 1 cup chicken or turkey cooked
  • 1 avocado mashed (or prepared guacamole)
  • 1/2 cup almonds sliced
  • 1/4 cup mayonnaise or cream cheese spread

Fillings

  • 3-4 oz smoked salmon
  • 1 cup cucumbers sliced thin
  • 1-2 T parsley chopped
  • 1 cup spinach or watercress chopped

Breads

  • 1/2 loaf wheat bread crusts trimmed
  • 1/2 loaf white bread crusts trimmed

Recipe Notes

Share
Pin
Share
0 Shares
You might also like:

Filed Under: Recipes Tagged With: recipe, tea

  • « Previous Page
  • 1
  • 2
  • 3
  • 4
  • 5
  • 6
  • 7
  • Next Page »
Suggested ResourcesFetchReceipt Hog

Archives

Popular Posts

10 DIY Gifts with Essential Oils10 DIY Gifts with Essential Oils
Natural Remedies for HeadacheNatural Remedies for Headache
10 Natural Remedies to Keep on Hand10 Natural Remedies to Keep on Hand
Henna Hands CraftHenna Hands Craft
Homemade Turkey Divan CasseroleHomemade Turkey Divan Casserole
This website uses cookies to improve your experience. We'll assume you're ok with this, but you can opt-out if you wish.Accept Reject Read More
Privacy & Cookies Policy

Privacy Overview

This website uses cookies to improve your experience while you navigate through the website. Out of these, the cookies that are categorized as necessary are stored on your browser as they are essential for the working of basic functionalities of the website. We also use third-party cookies that help us analyze and understand how you use this website. These cookies will be stored in your browser only with your consent. You also have the option to opt-out of these cookies. But opting out of some of these cookies may affect your browsing experience.
Necessary
Always Enabled
Necessary cookies are absolutely essential for the website to function properly. This category only includes cookies that ensures basic functionalities and security features of the website. These cookies do not store any personal information.
Non-necessary
Any cookies that may not be particularly necessary for the website to function and is used specifically to collect user personal data via analytics, ads, other embedded contents are termed as non-necessary cookies. It is mandatory to procure user consent prior to running these cookies on your website.
SAVE & ACCEPT